Sorry, we found 0 results. Please try another query.
Showing max 10 of results

Restore my AzureVM from Backup

I have an Azure VM for development purposes. You can read how I’ve created it here.

Ok so you know how it is setup including the backup part. Backup in Azure is awesome because it is just a few clicks away.
I’m running Windows 10 on the VM and I’ve enabled Insider Previews in the “Slow Ring”.
Not a really good idea.

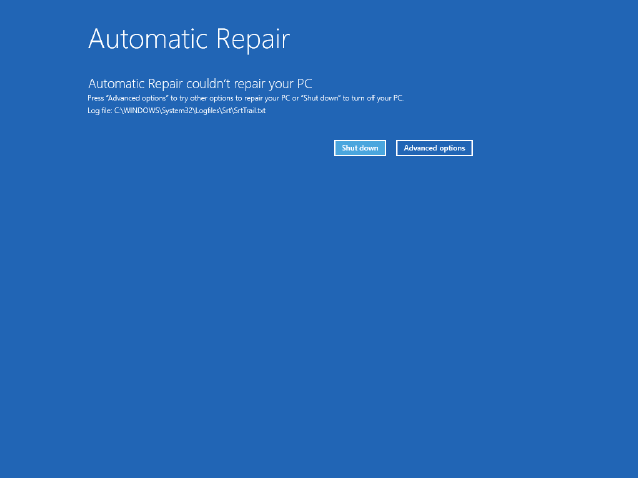
A few days after the update the VM stopped booting. Here is the Boot Diagnostics screen:

/images/2018/vm-automatic-repair-failed.png

It is a VM so there is no chance to click in this screenshot. Even a reboot did not fix it.
Thankfully, I have the VM backup configured so I can go back with the OS disk before the insider preview was installed.

Restore

Here are the steps to restore the OS disk, but without touching the existing VM and the VM configuration.

  1. Create a new storage account. It will be used as a temp storage for the restored disks. It must be a Standard (not Premium) tier storage account.

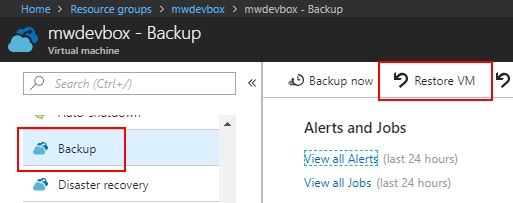
  2. Go to the Backup blade and select Restore VM

/images/2018/vm-restore1_orig.jpg

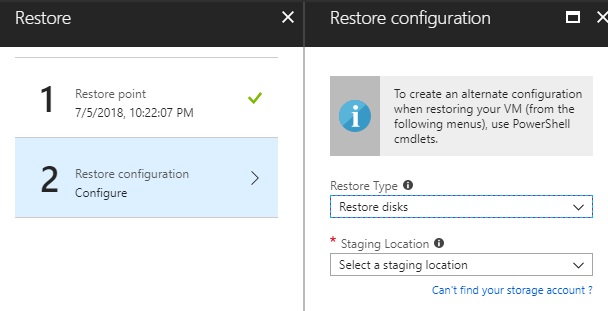
  1. If you want to keep all your VM settings select Restore disks as the restore type, then select the storage account created in step 1.

/images/2018/vm-restore2_orig.jpg

  1. Wait until the disks are restored. Now you need to create a new managed disk based on the restored vhd file.
    Click “Create a new resource” and search for Managed Disk.
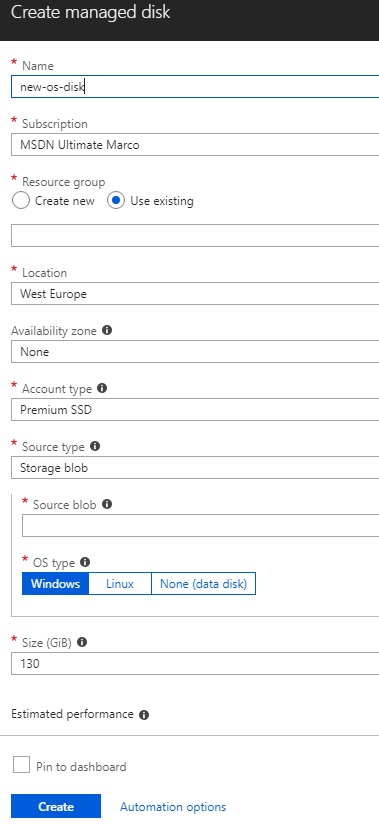
    Create a new managed disk within the same resource group as your VM and select Storage blob as the source type. Make sure you select the correct OS type.

/images/2018/vm-restore3_orig.jpg

  1. Now there is only one challenge left: Swap the existing disk with the restored OS disk. A walkthrough can be found in the Azure docs
$vm = Get-AzureRmVM -ResourceGroupName myResourceGroup -Name myVM 

$disk = Get-AzureRmDisk -ResourceGroupName myResourceGroup -Name newDisk

Set-AzureRmVMOSDisk -VM $vm -ManagedDiskId $disk.Id -Name $disk.Name 

Update-AzureRmVM -ResourceGroupName myResourceGroup -VM $vm

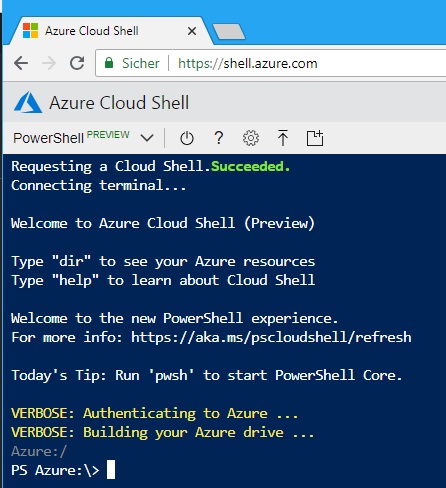
If you do not have and or you do not want to install the Azure PowerShell commandlets, you can just visit https://shell.azure.com to have a shell directly in the browser.

/images/2018/vm-restore4_orig.jpg

Ultraschall Füllstandssensor für die Regenwasser Zisterne

Warum?

Ich habe im Garten eine Regenwasser Zisterne, etwa wie diese. Das Regenwasser vom Dach wird dort gesammelt und kann dann zum Gießen, Rasensprengen, o.ä. verwendet werden.

Ich möchte nun gerne wissen wie voll die Zisterne gerade ist, und das natürlich ohne rein zu sehen.

Die Idee ist, einen Ultraschallsensor (wie er am Auto zum Einparken verwendet wird) zu nutzen.

Hardware

Für die Realisierung habe ich mir folgende Teile besorgt:

Achtung: Vor dem genannten Ultraschallsensor hatte ich zunächst diesen probiert, da er eine längere Zuleitung hat und in einem Gehäuse verpackt ist. Entgegen der Beschreibung scheint es 2 verschieden Versionen zu geben, einmal mit dem Trigger Signal und einmal als Serielle Version. Das muss man bei der Anbindung wissen.

Ich habe das ganze mit einem Raspberry gelöst, geht aber natürlich auch auch mit einem Arduino (o.ä.). Ich hatte jedoch noch einen Raspberry Pi 2 mit USB WLAN Modul rumliegen.

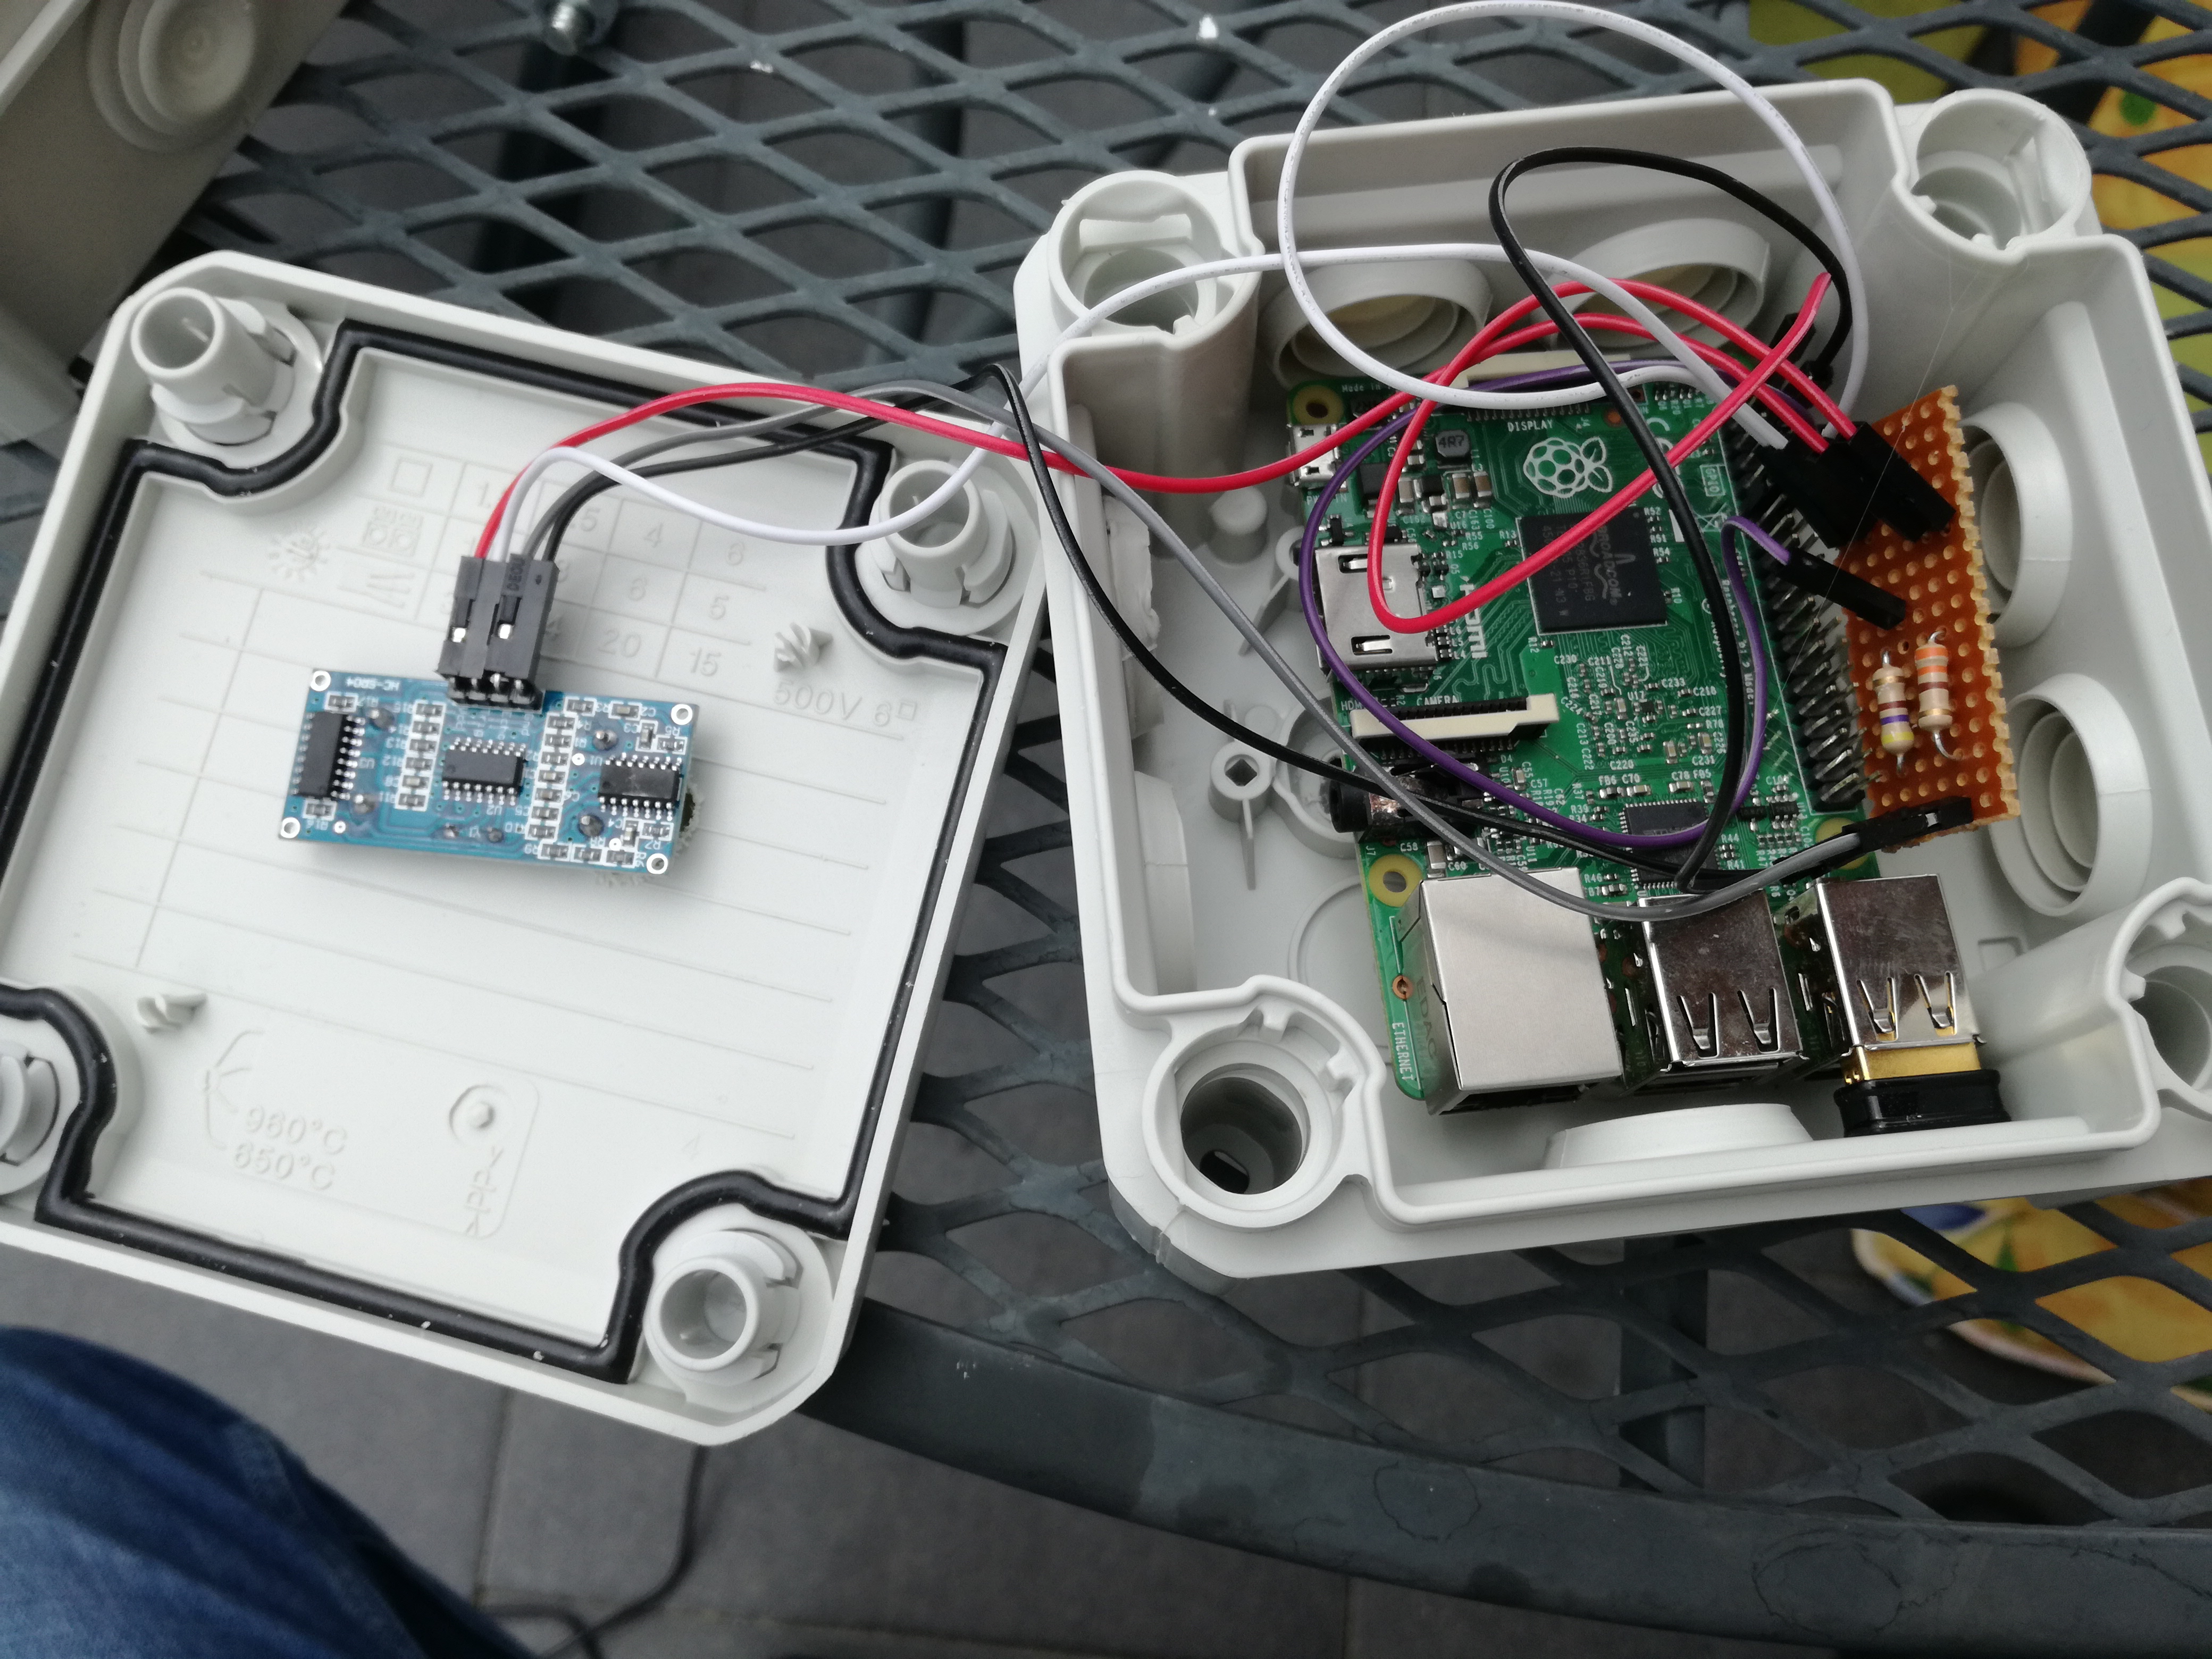
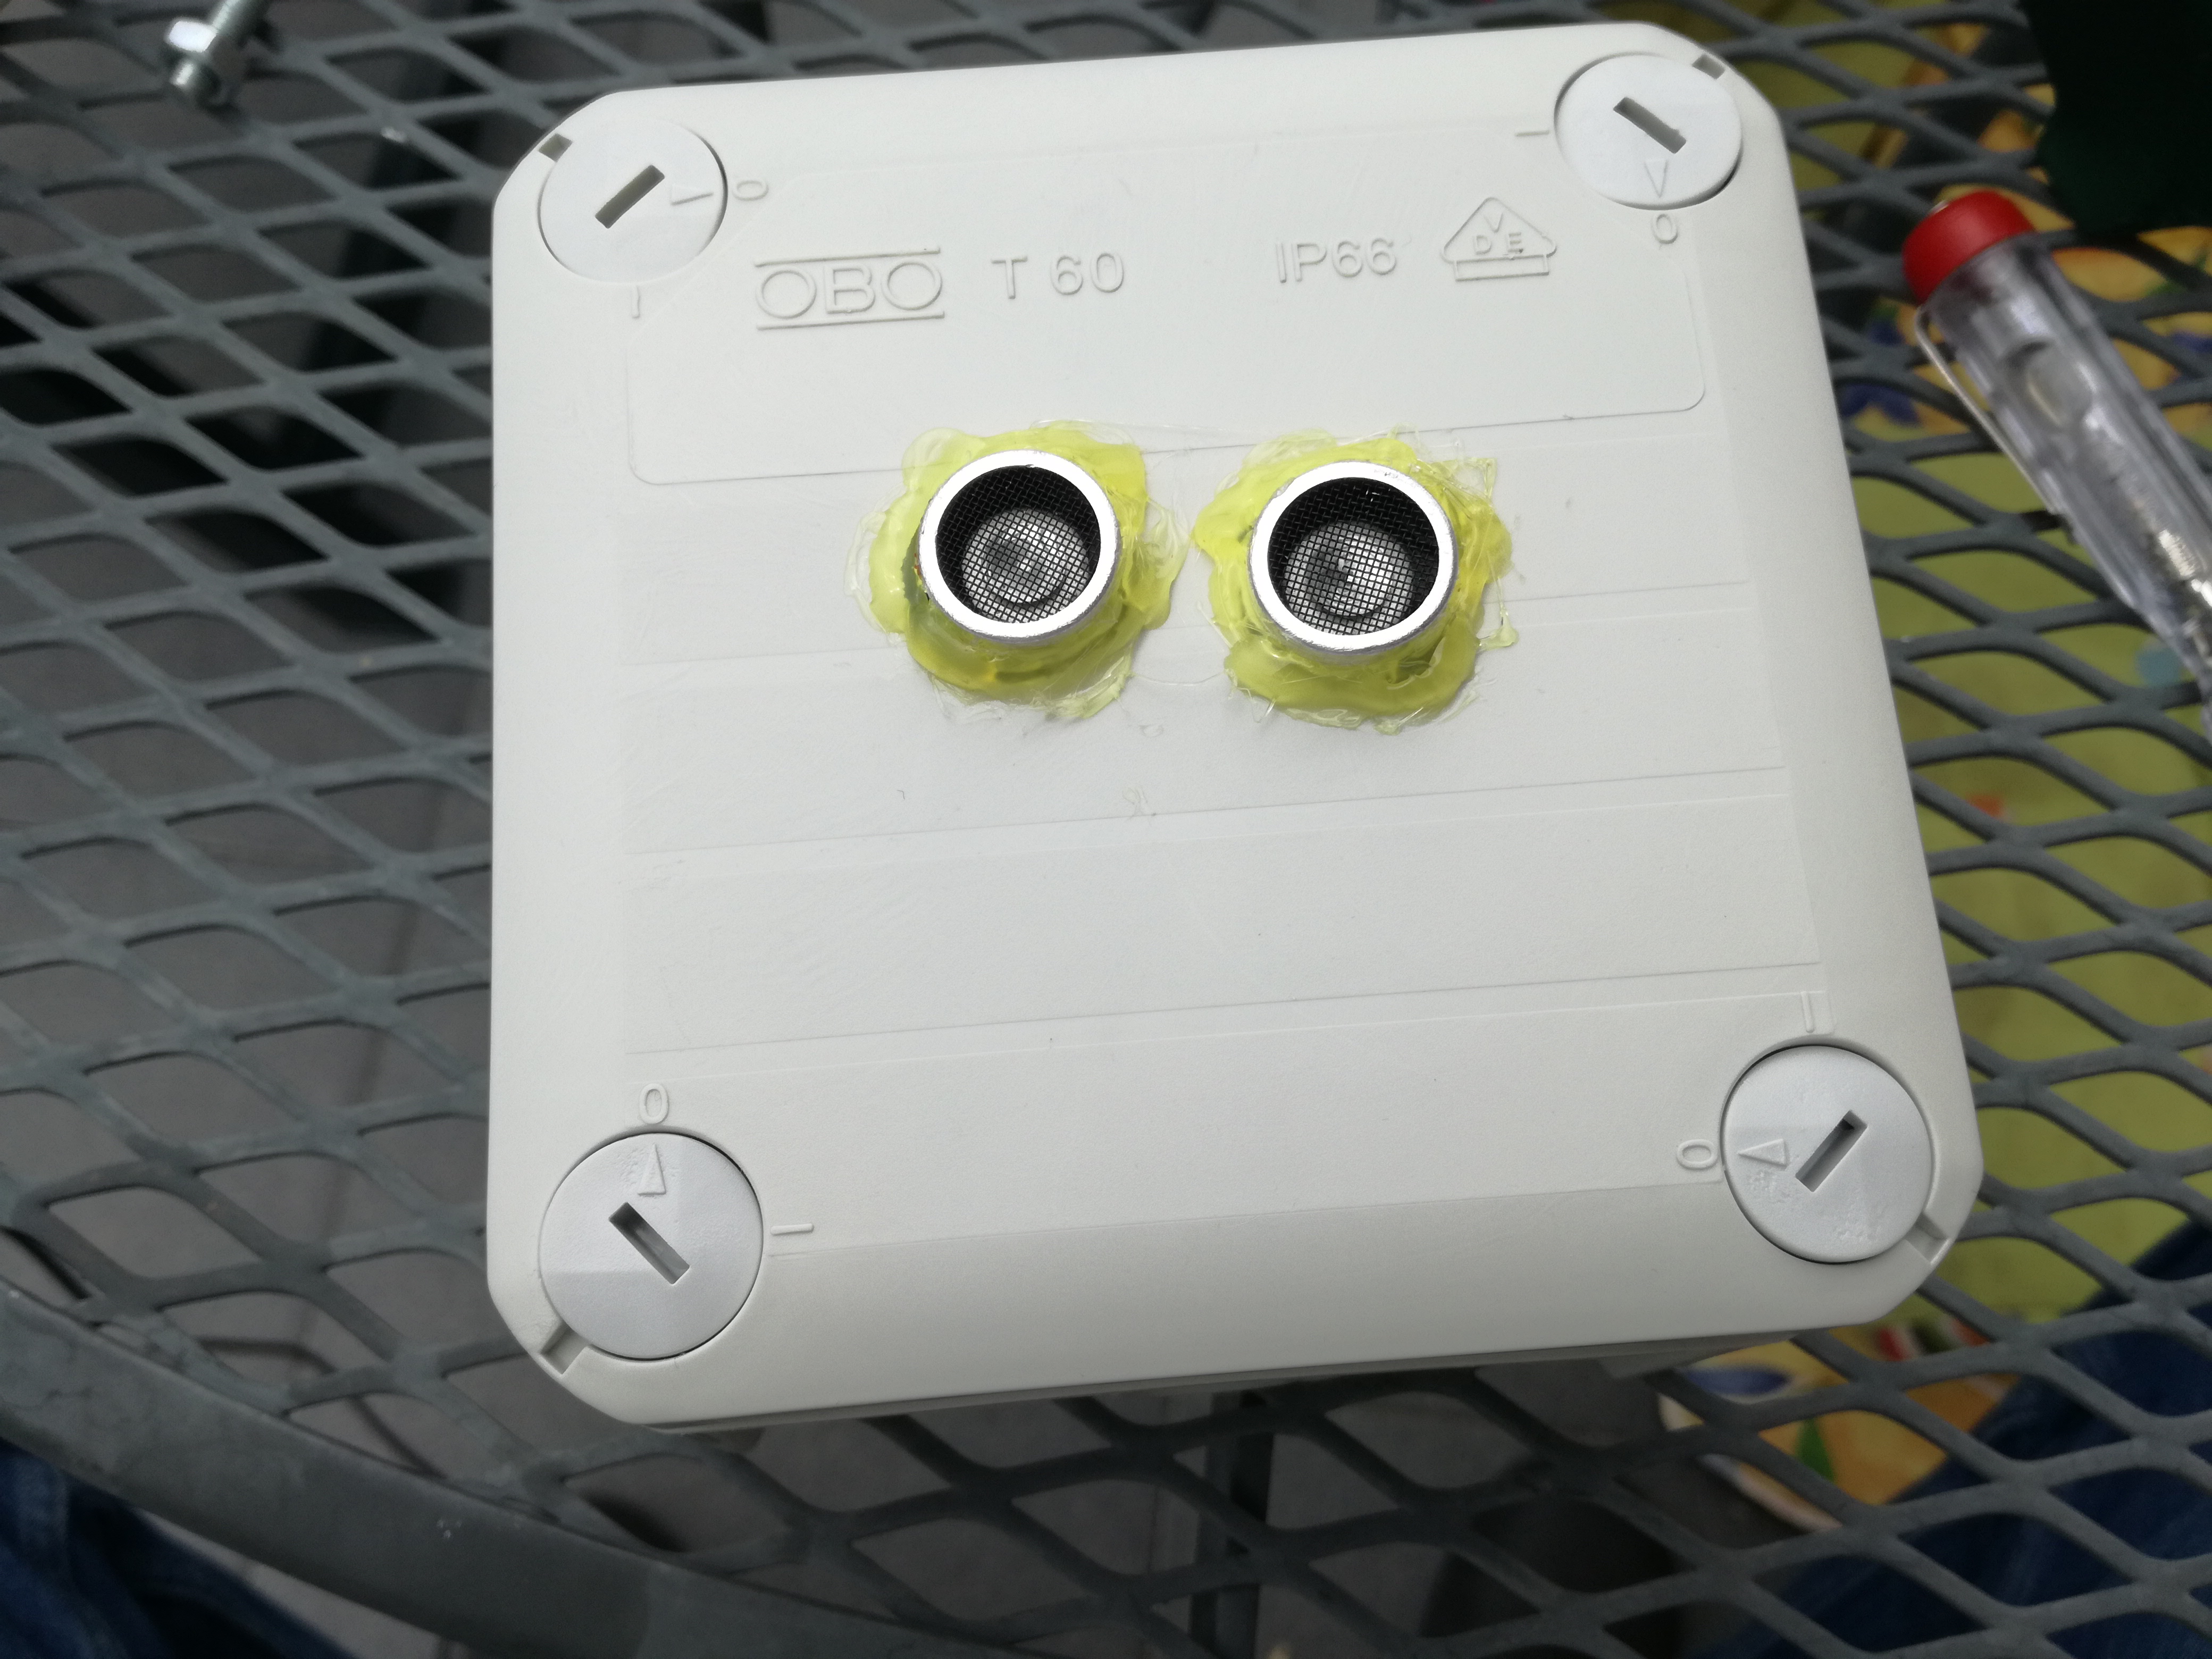
Zusammengebaut sieht das ganze dann so aus:
/images/2018/Ultraschall1_orig.jpg /images/2018/Ultraschall2_orig.jpg

Die Dose habe ich in der Zisterne am Deckel verschraubt, so dass der Ultraschallsensor auf die Wasseroberfläche zeigt und den Abstand misst.

Software

Softwareseitig habe ich, wie bereits bei anderen Projekten, auf die bewährte Lösung gesetzt: .NET Konsolenanwendung mit mono.

Diese läuft in einem Cron Job um regelmäßig über die GPIO Ports den Ultraschallsensor zu triggern und die Entfernung zur Wasseroberfläche zu messen.
Das Ergebnis wird dann per UDP an meine Loxone Installation gesendet. Mit einem einfachen Status Baustein zeige ich den aktuellen Füllstand (derzeit nur Voll/Halbvoll/Leer) an.

/images/2018/Ultraschall3_orig.jpg

Hier verwendete Produktlinks sind Amazon Affiliate Links. Wenn du sie benutzt, hilfst du mir mehr Gadgets zu kaufen.

Create a dev machine in the cloud for daily use

I’m a software developer, so today I want to show how to create a development VM in Azure.

Create VM

Go to Azure and create an account if you do not yet have one. If you have an MSDN (aka Visual Studio) subscription log in and activate your free Azure credits right there.
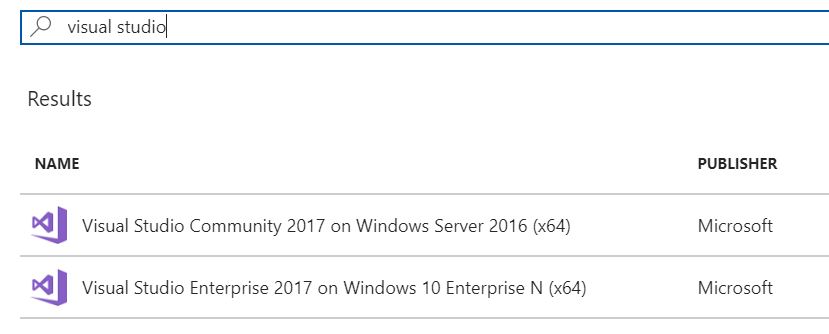
Now in the Azure Portal click Create a ressource and search for Visual Studio. Now select Visual Studio Community Edition which is free or Enterprise if you have an Enterprise subscription. I’ve choosen VS on Windows 10, but you can even select VS on Windows Server 2016.
/images/2018/azurevs_orig.jpg

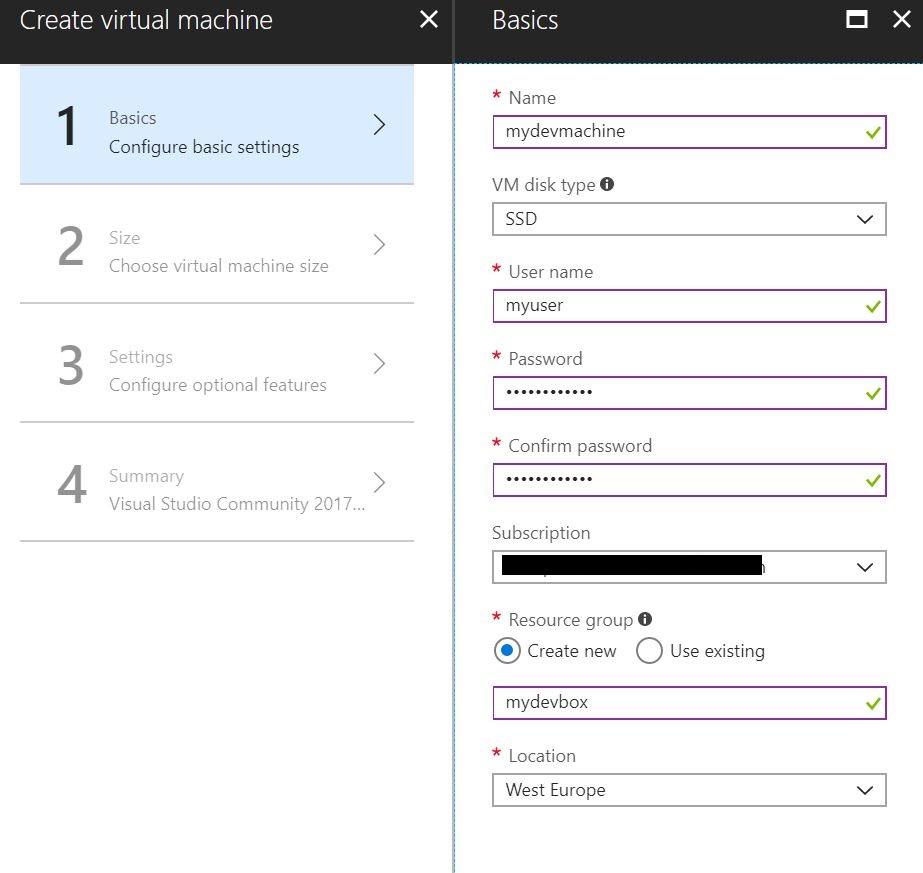
First you have to give it a name and select the storage type. Default is SSD which I also recommend for the best performance. Then enter a username you want to use and a password.
/images/2018/azurevs1_orig.jpg

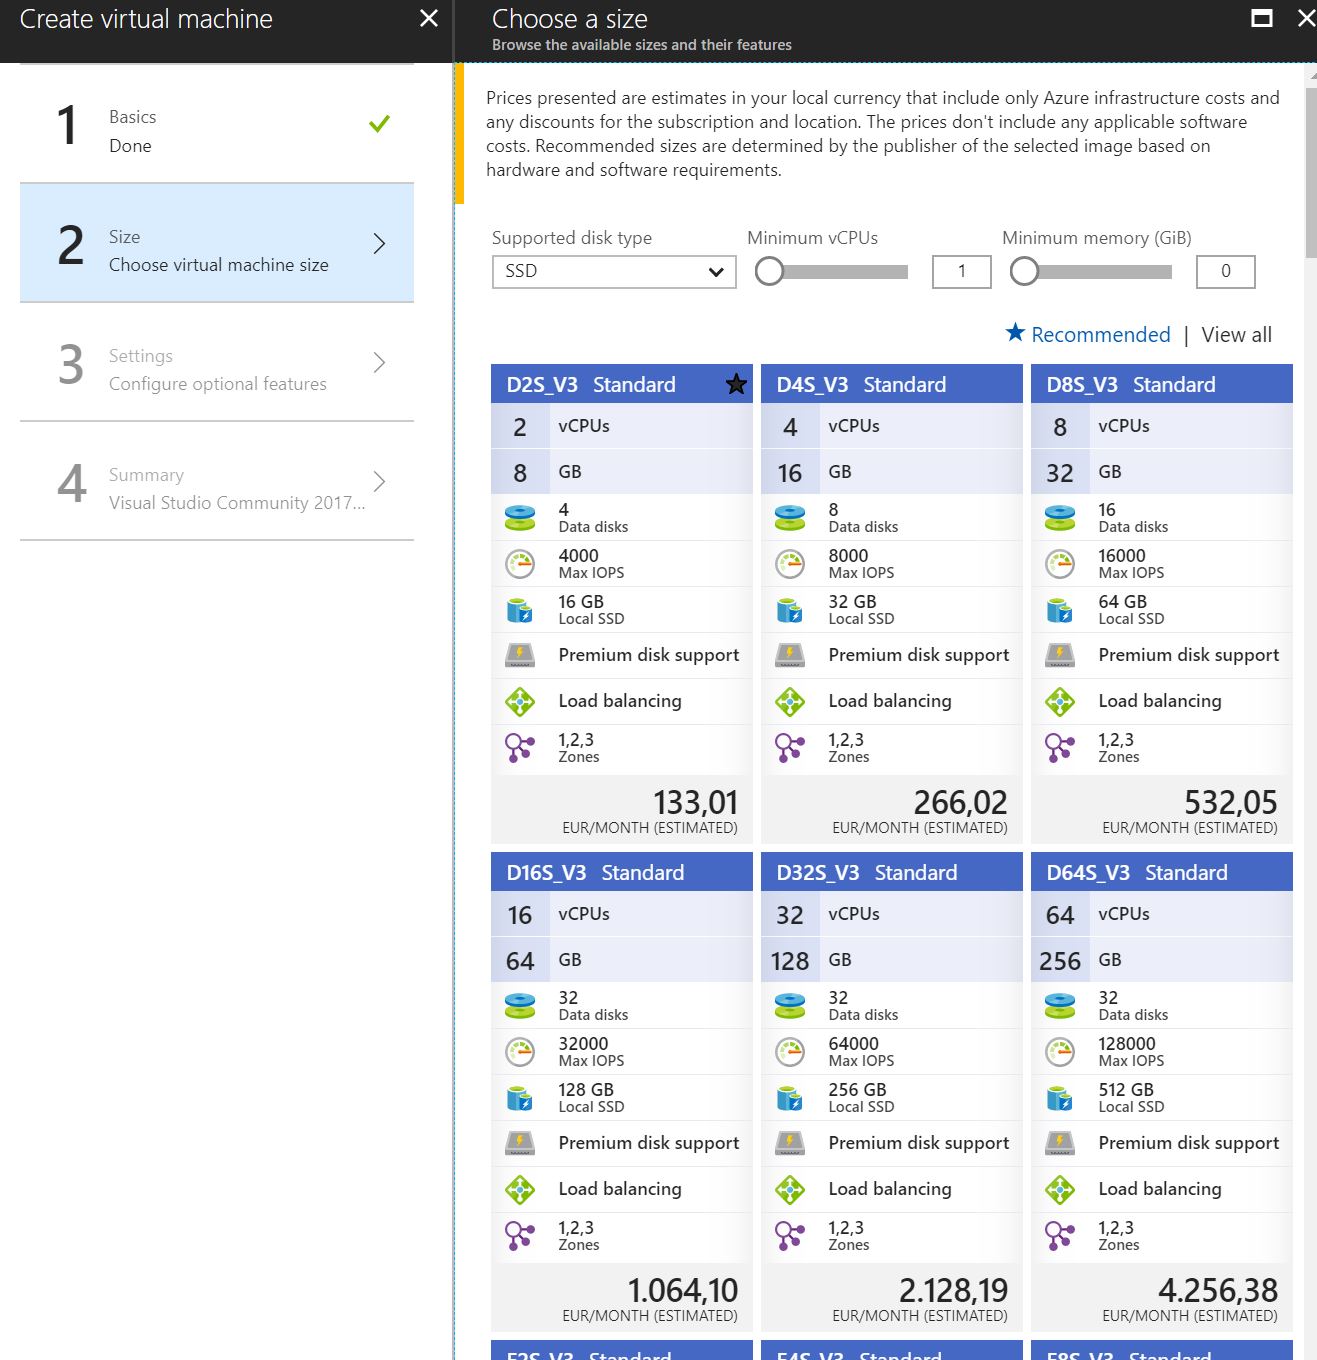
Now you have to choose a size of your new VM. As you can see, there are a lot of options available. The estimated price would be the price if your VM is up and running 24/7 for a month. However, my dev machine will only run if I’m using it, so I can choose a bigger machine even if I have not enough credits to run this machine for an entire month. Each ressource is billed per minute which is awesome. I will go with 4 CPUs and 16GB RAM. So running this machine for one hour will cost me about 0,20 EUR.
/images/2018/azurevs2_orig.jpg

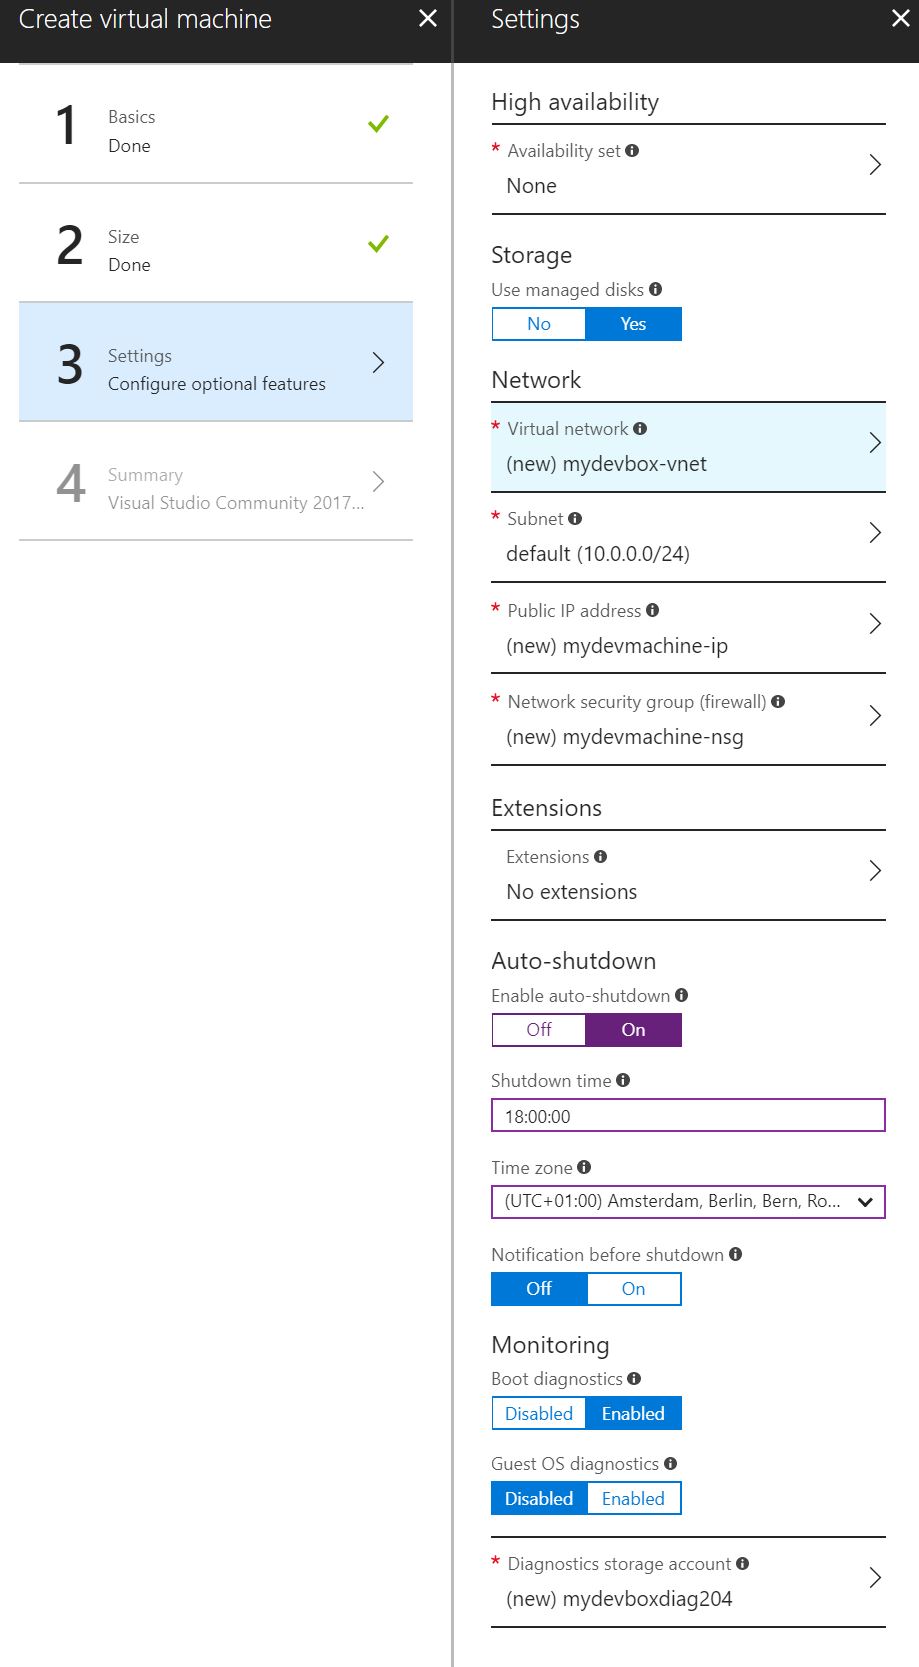
In the last step you can define networking stuff, but I will use the defaults here for now.

Auto-shutdown

Just one setting is really important: Auto-shutdown. As you can see here, I have enabled auto-shutdown and set it to 18:00. That means: Whenever you leave the office and forgot to shutdown your machine, Azure will do it for you at the specified time. You can even send notifications before shutdown which can be configured later.
/images/2018/azurevs3_orig.jpg

Networking

Now wait a few minutes until the machine is provisioned.
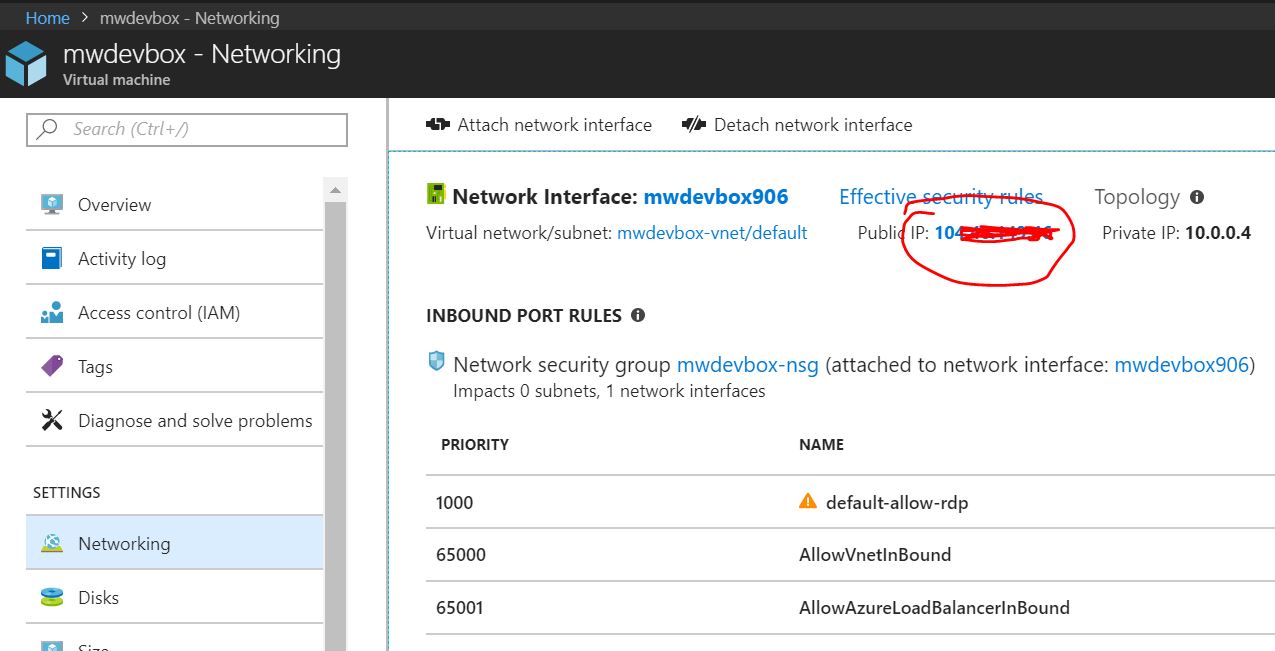
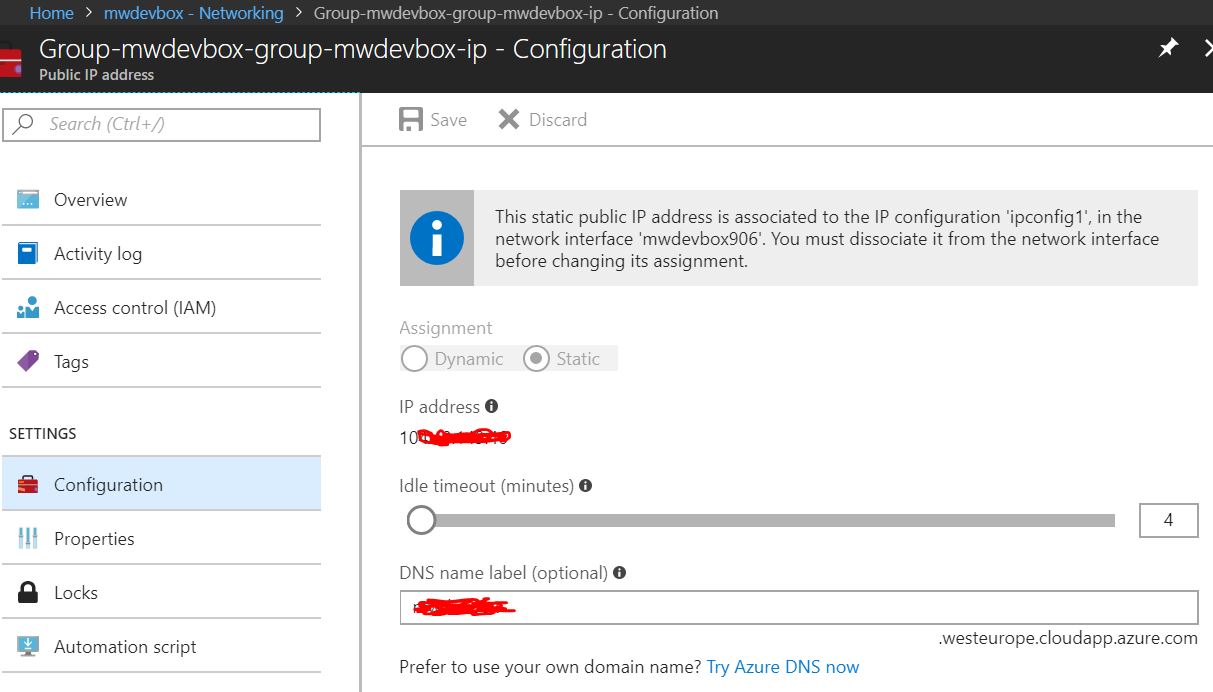
The next step is to set a static IP for your machine and a DNS name if you want to. Click on your VM in the portal and then Networking. There you can see your public IP. If you click it, you can define a DNS name as well and switch from dynamic to a static IP.
/images/2018/azurevs4_orig.jpg /images/2018/azurevs5_orig.jpg

Disks and Backup

Now go to the Disks tab in your VM and add a new data disk. There you can store all data independently from the rest of your VMs OS disk. Also it is on another LUN so you have done everything you can for the best performance ;-)

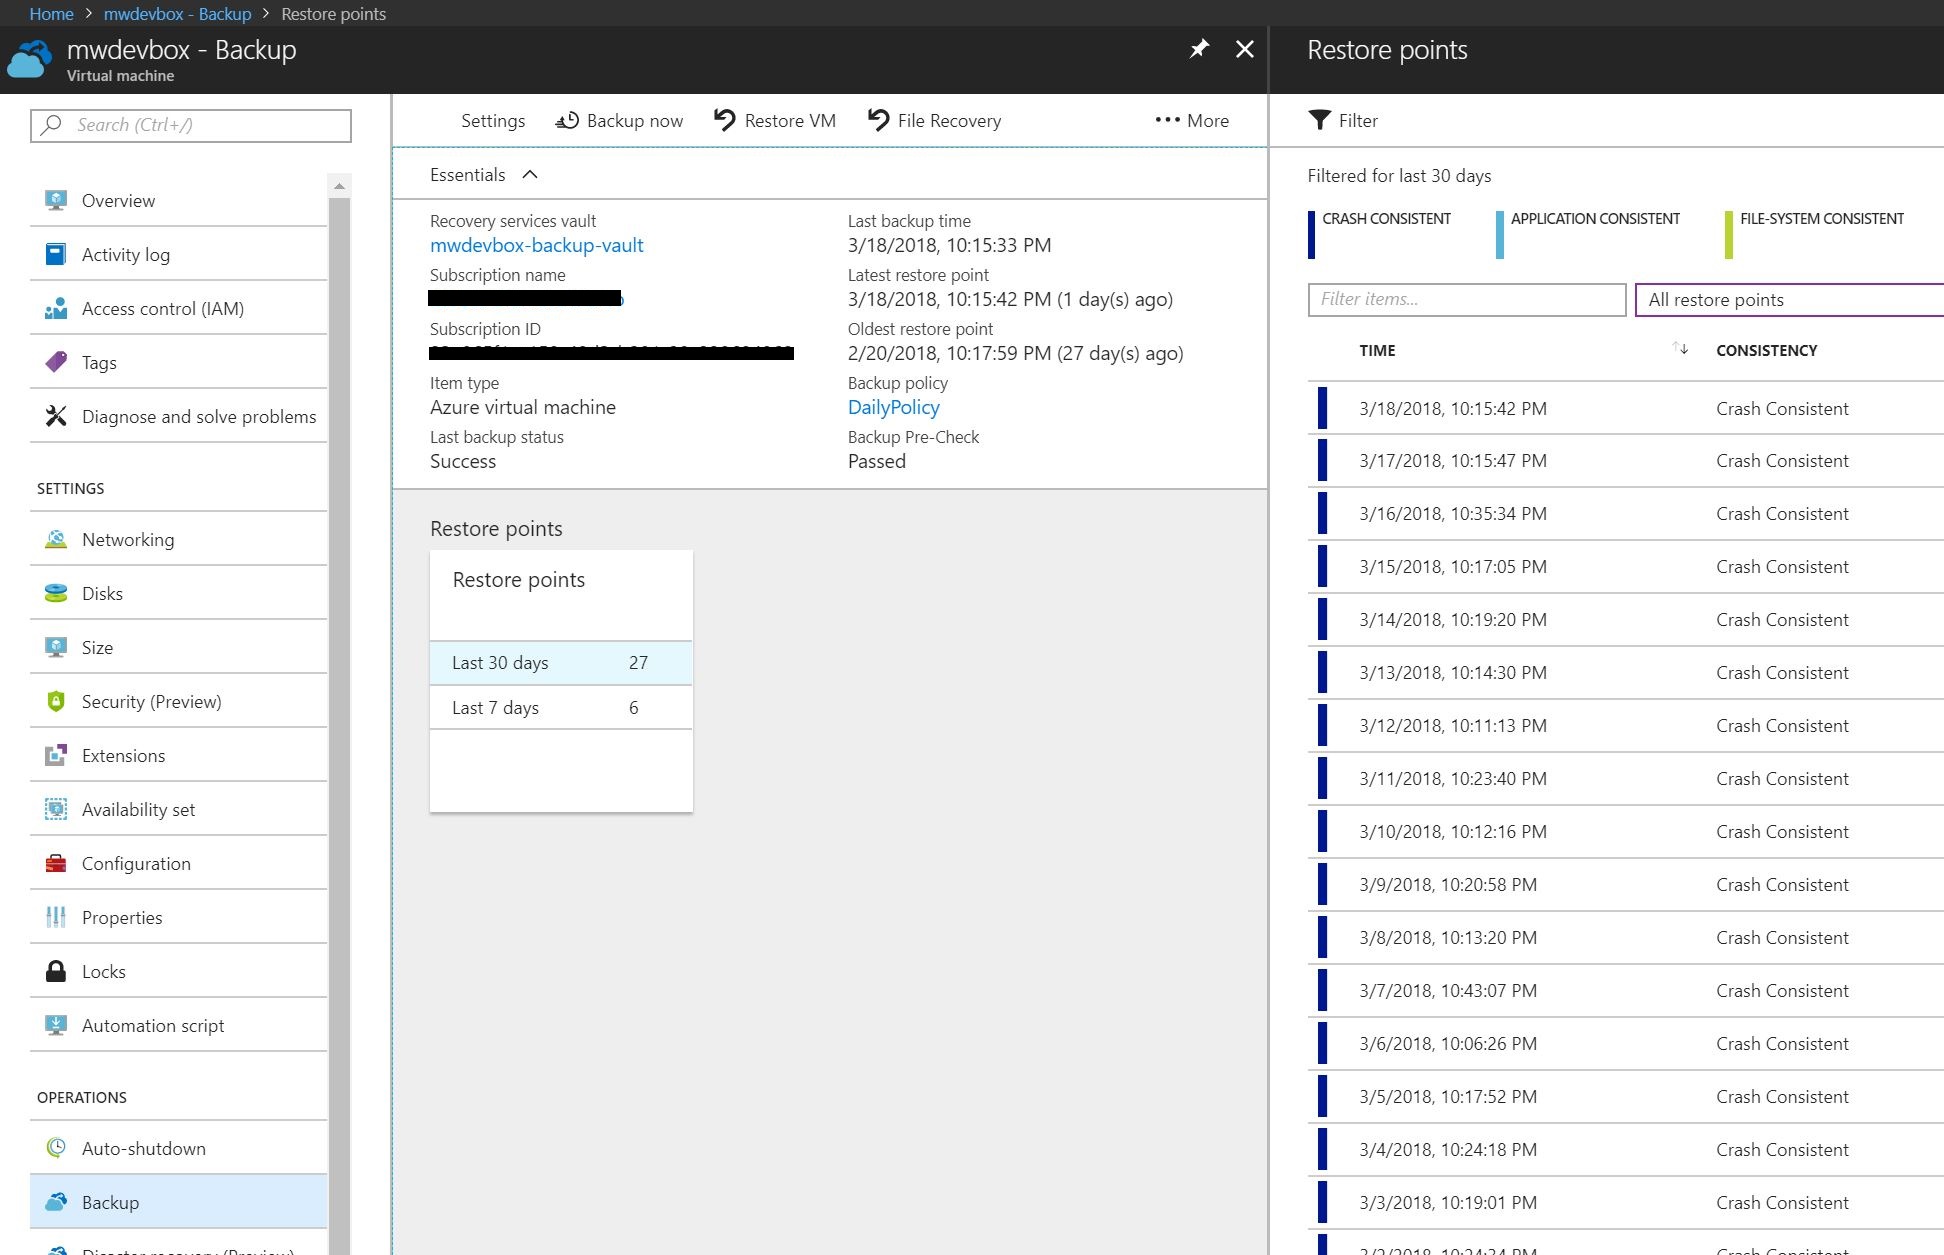
What I’ve done now is to go to the Backup tab and configure an automatic daily backup. With this backup you can restore the VM to any day in the last 30 days. You can even restore single files on your disks. Therefore Azure mounts the disk you selected locally and you can copy single files from the disks. Awesome!

Keep in mind: Disks/Storage and Backup have it’s own price tag, so check that before configuring it.

/images/2018/azurevs6_orig.jpg

Using it

You can now Remote Desktop into the machine via the Connect button on the VM overview tab. If you have selected a static IP and DNS name you can connect using them.
Now install all your favorite dev tools within the VM. Visual Studio is already installed but needs to be updated (of course).

How to use Microsoft Flow to start and stop the VM from my mobile

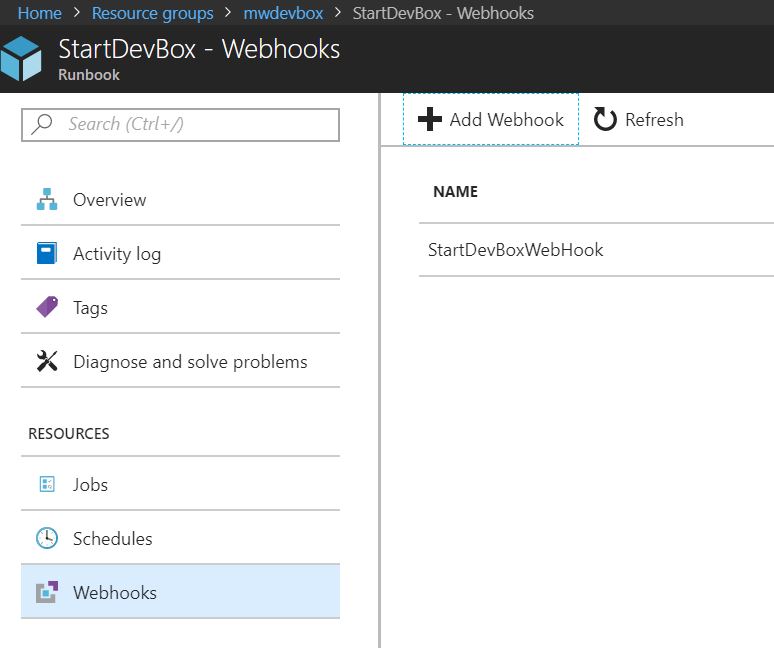
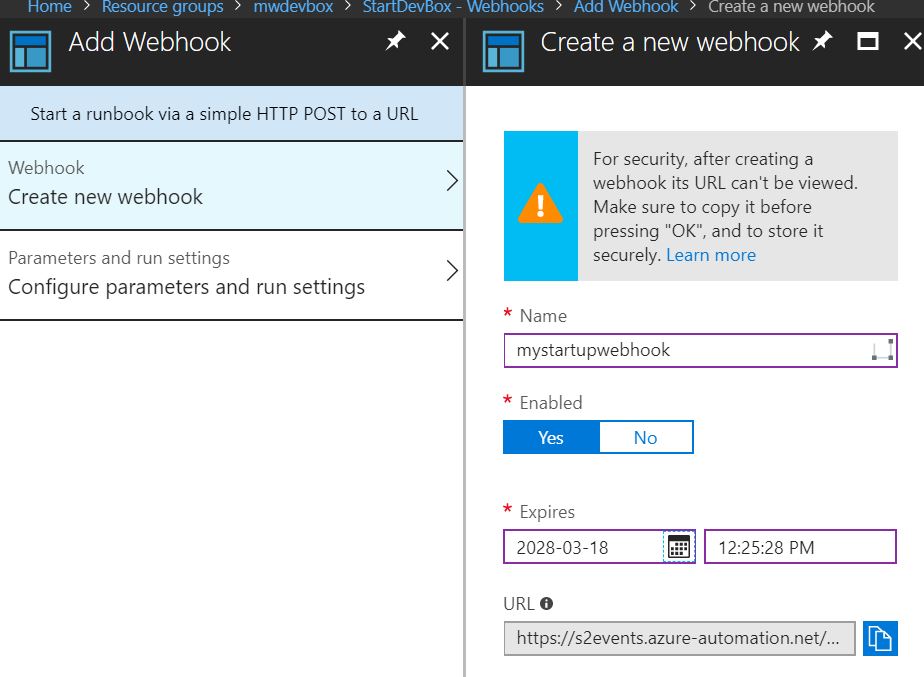
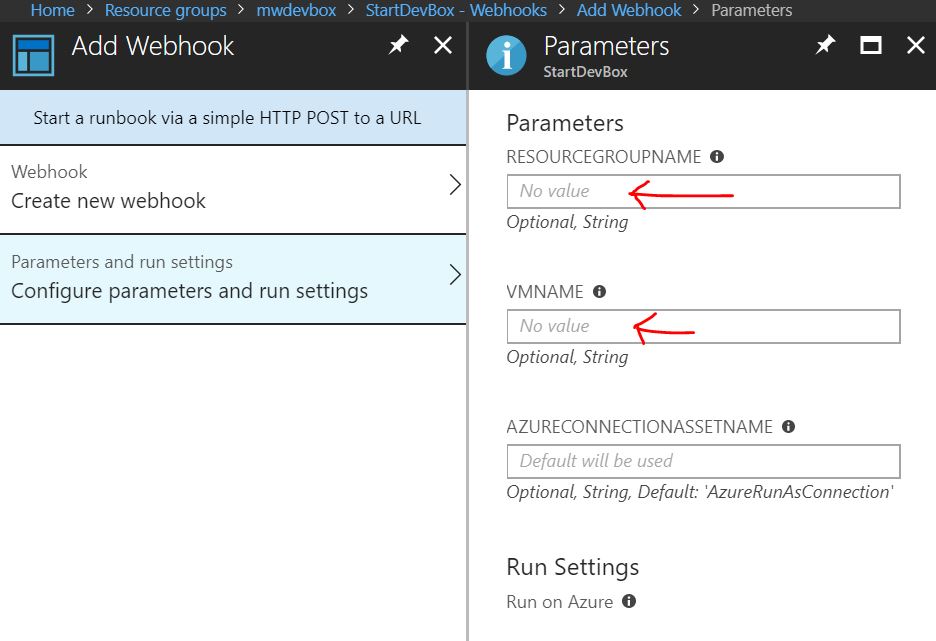
First of all, go to this blog post from Søren Rasmussen. He describes how to automate startup and shutdown of Azure VMs with the help of Azure Automation Services. After you have created the so called runbooks go to the startup runbook, click Webhooks->Add Webhook
/images/2018/azurevs7_orig.jpg /images/2018/azurevs8_orig.jpg
/images/2018/azurevs9_orig.jpg
Make sure you copy the webhook URL before clicking OK, because there is no way to see the URL again.
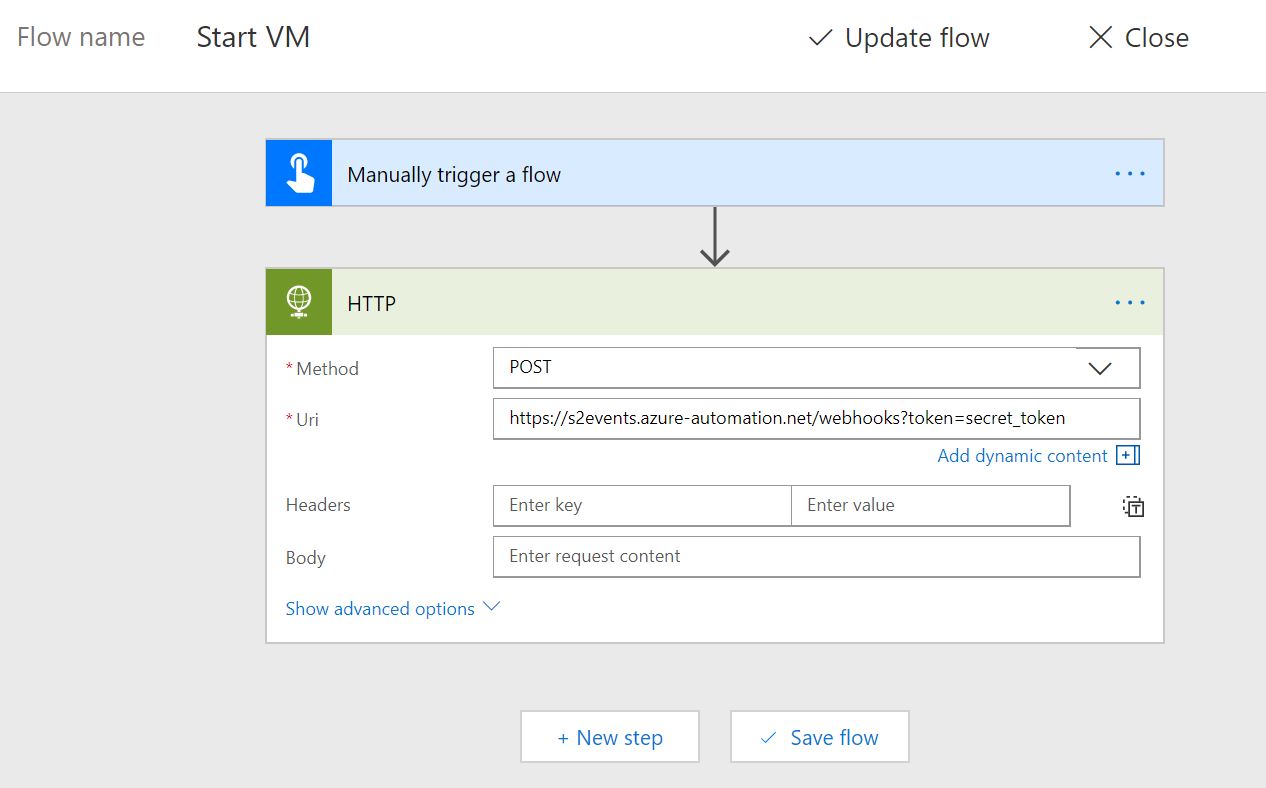
The URL looks like: https://s2events.azure-automation.net/webhooks?token=some-secret-token
Do the same for the shutdown runbook.

Create Flow buttons

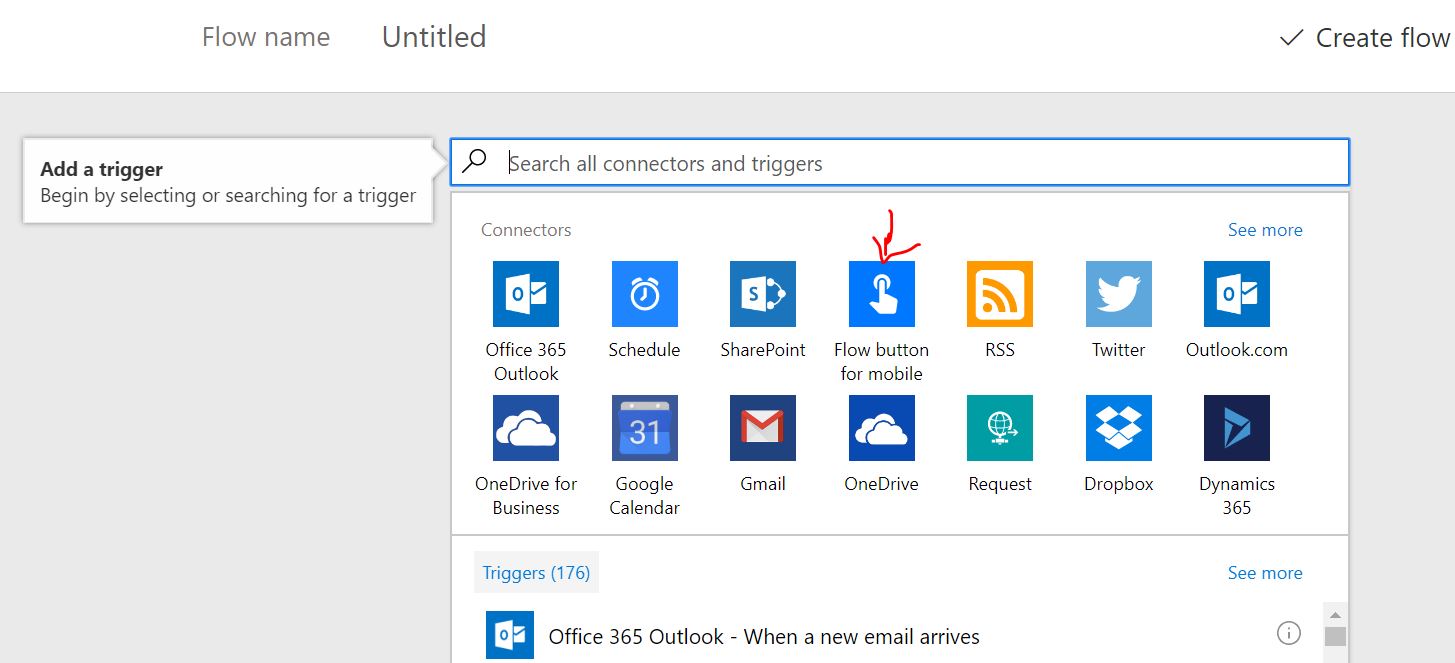
Login with your account to Flow. Click on My Flows -> Create from blank.
You should see a Flow button for mobile.
/images/2018/azurevs10_orig.jpg
Then add a new action. Search for http and selet POST as the method and paste the webhook URL from your runbook.
/images/2018/azurevs11_orig.jpg

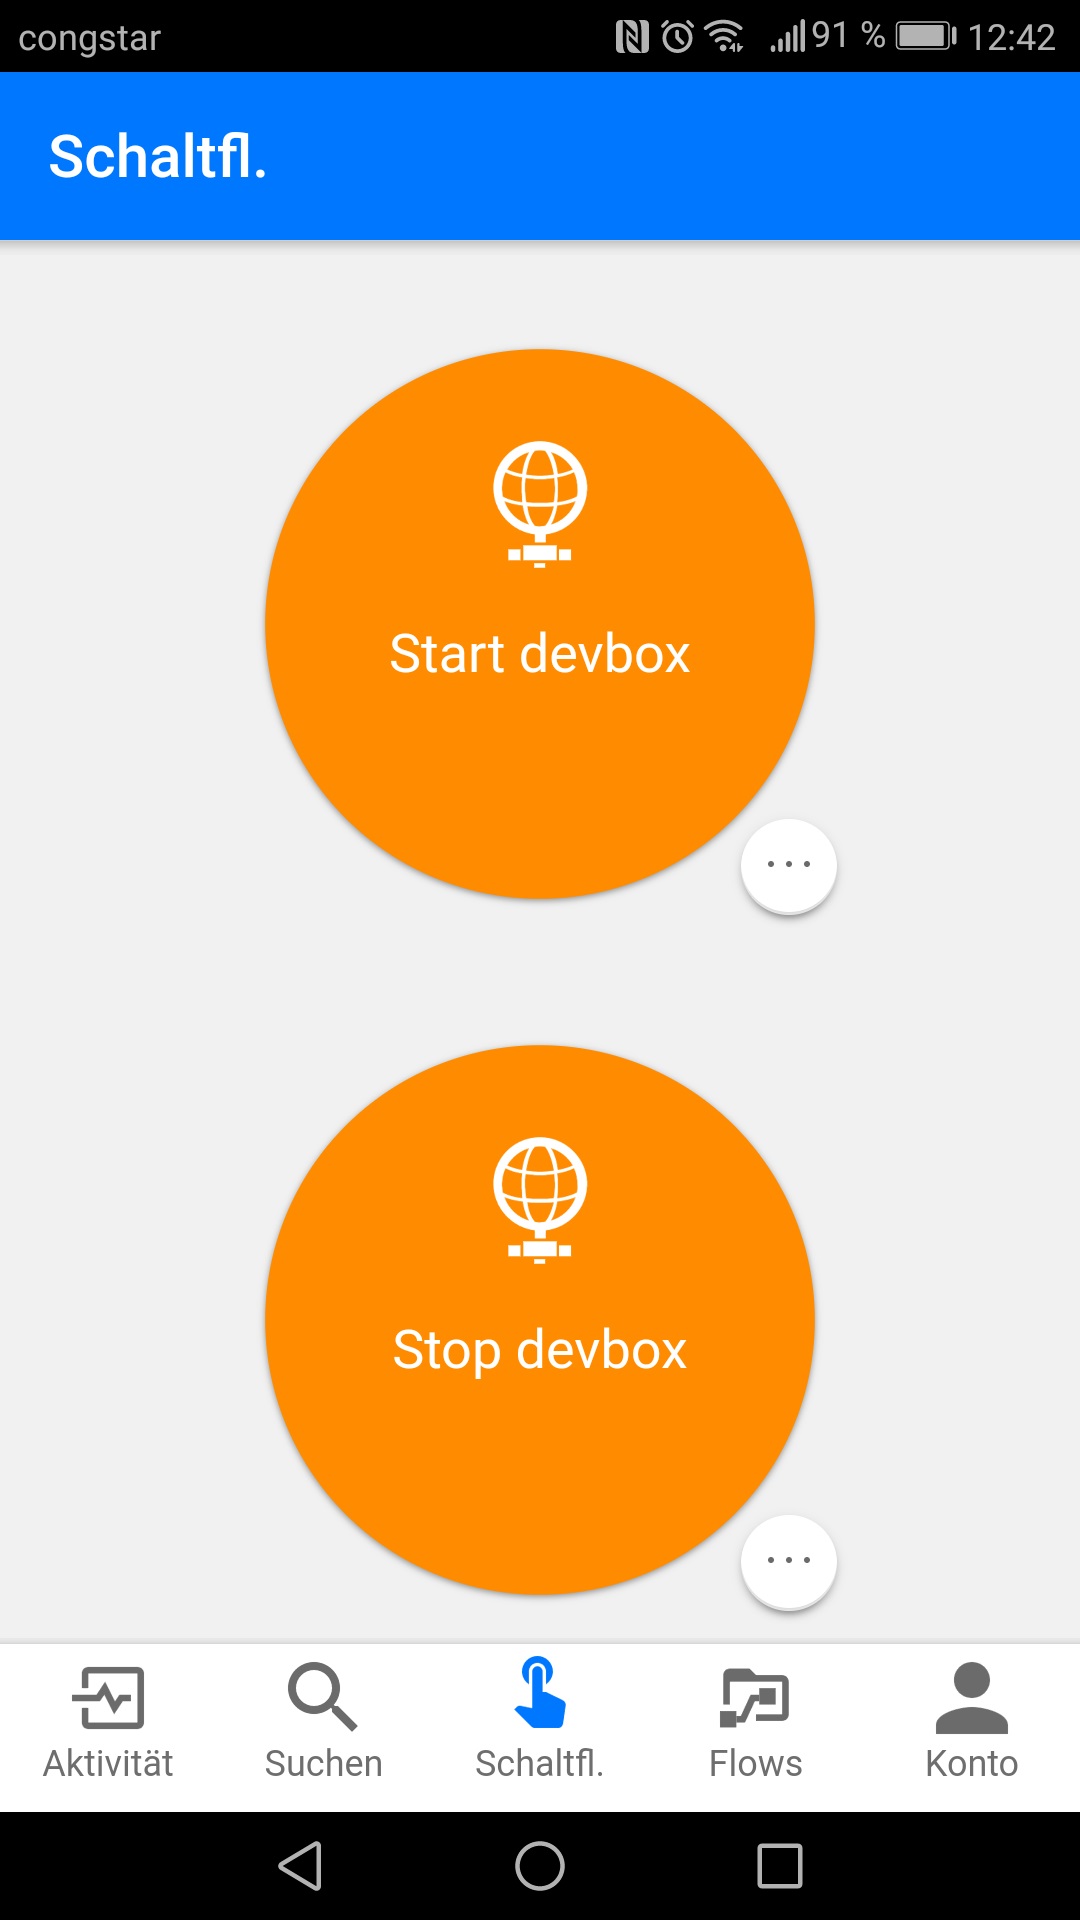
That’s it! On your mobile download the Flow app and there you can see your buttons and start your VM on the way to the office.
/images/2018/azurevs12_orig.jpg

Note: It can take a minute (on my first try it took a few more minutes) to kick of the runbook and start the VM.
Add comments to this blog

I have had no comments enabled since I have moved my blog to hexo. There are some solutions with Disqus available, but I thought it is a good chance to build it myself.

First of all I created a new storage account in Azure to store all comments in table storage which is simple, easy to use, cheap and fast.
Then I needed an API which stores and retrieves the comments from the table. Azure Functions is perfect, because it has ready-to-use templates for HTTP POST and GET with table storage. It generates a url to call the functions.
In my javascript within this blog I have added a few lines of code to add and render existing comments.

It is a first try and the design is awful, but it works. I will monitor it over the next few weeks and see if it works or if I move to something like Disqus.

Automate blog image thumbnail generation with Azure Functions and Event Grid

Update:
There was an error in the thumbnail create code. The block blob automatically gets the content type application/octet-stream which is wrong for images. It should be image/jpeg.
I have fixed the referenced code.


Ok well, that’s a really long title for this post.
My blog is a static site running on Azure CDN generated by Hexo.
I’m writing my blog posts in Visual Studio Code. The downside of this solution is, that there is no server side code. That means images has to be resized locally to provide a thumbnail.
The lightbox code is already built-in in Hexo, but I have to provide two images: The thumbnail and the large one. Really cumbersome… and unneccessary.

Azure Functions to the rescue

Azure Functions is an event driven, compute-on-demand experience that extends the existing Azure application platform with capabilities to implement code triggered by events occurring in virtually any Azure or 3rd party service as well as on-premises systems.
Source: https://github.com/Azure/Azure-Functions

That means, you write code which executes based on events. The events are managed and generated by Azure Event Grid.

Azure Event Grid allows you to easily build applications with event-based architectures. You select the Azure resource you would like to subscribe to, and give the event handler or WebHook endpoint to send the event to.
Source: https://docs.microsoft.com/en-us/azure/event-grid/overview

The best thing: Azure Functions and Event Grid is priced by consumption and has a lot of free executions per month. Overall this solution cost me nothing.

The steps to automate thumbnail generation

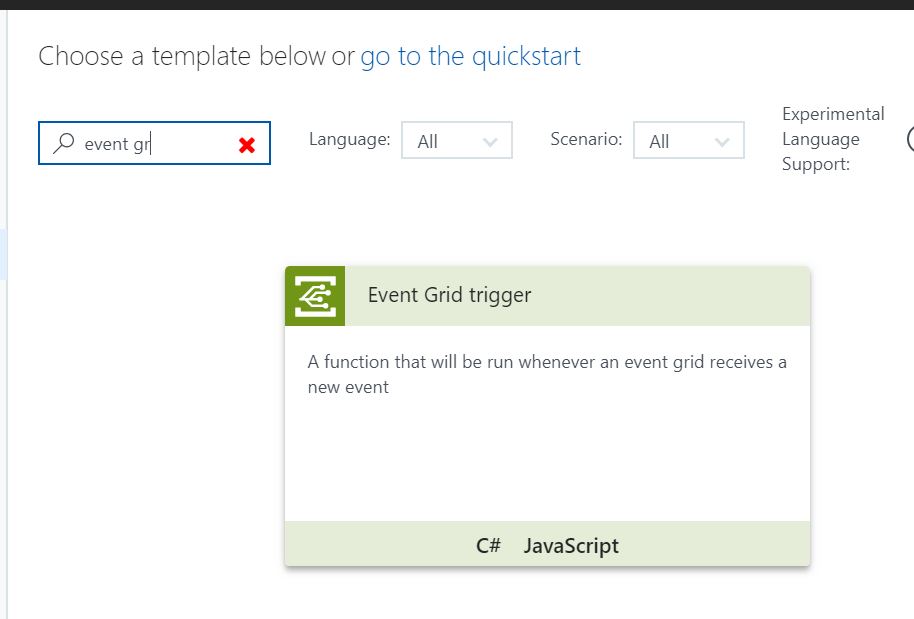
  • Create a new Azure Function (search for event grid)
    /images/2018/FunctionCreate.jpg

You can find the code here

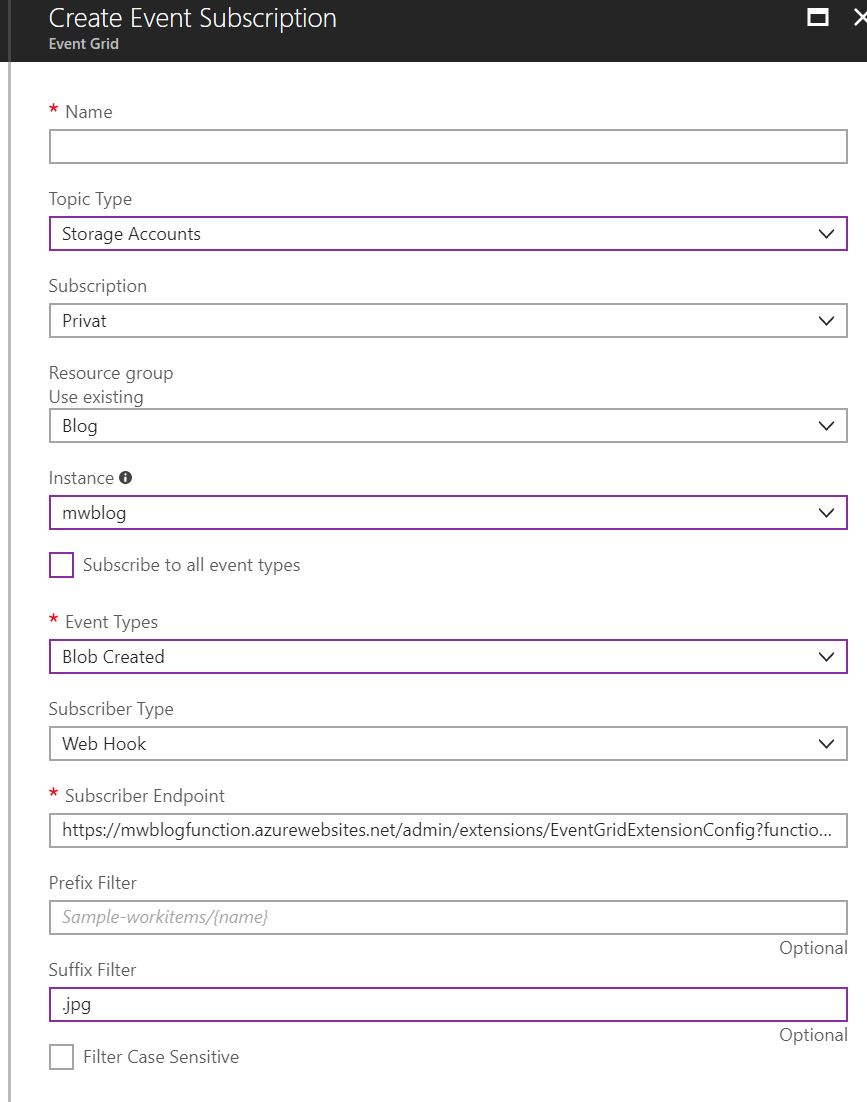
  • On the “Integrate” tab click on create near the “Event Grid Subscription URL” textbox. This will guide you through the steps to create an event subscription.
    /images/2018/FunctionCreate2.jpg
  • That’s it!

If you can see the thumbnail images in this post, it works!